WE ARE HIRING NOW
 Proudly Canadian


Mitsubishi Electric System Repair
Experiencing a hitch with your Mitsubishi Electric heating & cooling system? Searching for premium service or a reliable installation of a new Mitsubishi Electric system? Look no further – our team of exceptional technicians is at your service!


Mitsubishi Electric HVAC Experts
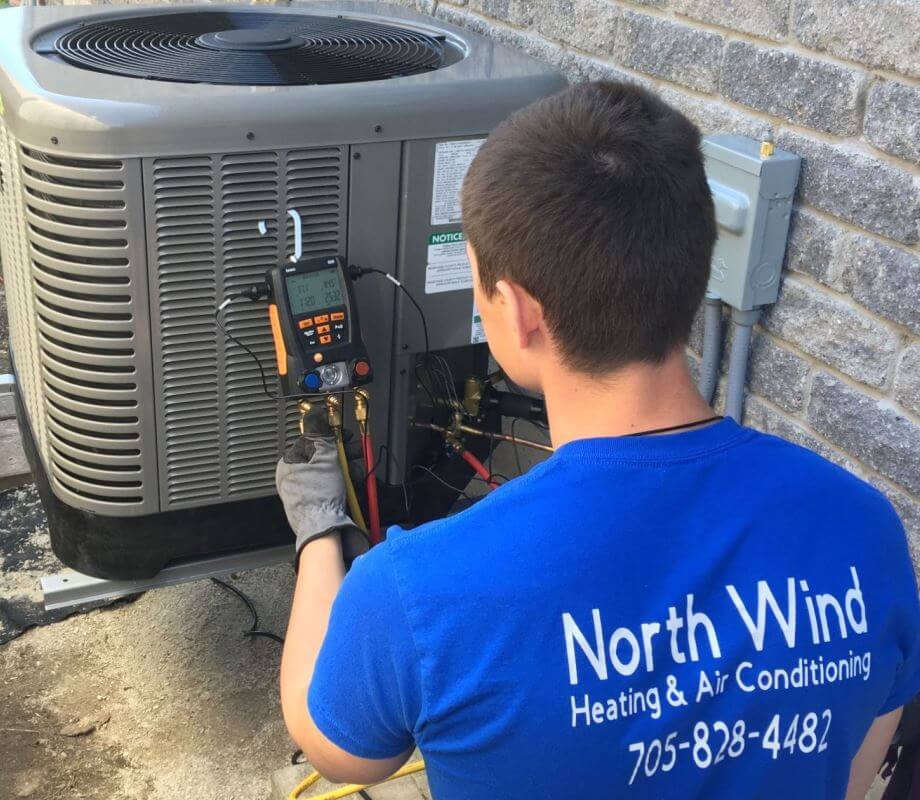
For expert Mitsubishi Electric heat pump system repair, trust North Wind HVAC Services. Our skilled technicians have years of professional experience, allowing them to make intricate on-site repairs and complicated installation projects.
As a licensed and insured provider, we prioritize your comfort and deliver professional service when you need it. At North Wind we provide reliable repair, installation and maintenance services for Mitsubishi Electric appliances, that you can trust.
- Free Estimate
- Same-Day Service (24/7)
Are You Looking For
Mitsubishi Electric Heat Pump Repair Near Me
As your local go-to destination for Mitsubishi Electric system repair services, North Wind HVAC technicians possess an in-depth understanding of Mitsubishi Electric systems, allowing them to make expert repairs and installations.
We are committed to exceeding your expectations with transparent pricing, 24/7 appointment availability, and reliable solutions. Choose North Wind HVAC for your Mitsubishi Electric repairs, and experience professional service, year-round comfort, and peace of mind right at your doorstep.

Expert Technicians
With Years of Experience
Fast and Reliable
Available 24/7
Affordable Services
Quality Service, Unbeatable Price
Certified and Qualified
Fully Licensed, TSSA ApprovedNorth Wind HVAC
Mitsubishi Electric Repair & Installation Services
Ductless Heating & Cooling System
Ducted Heating & Cooling System
What We Do:
Mitsubishi Electric HVAC Services
Mitsubishi Electric Ductless System Repair & Installation
When it comes to ductless heating & cooling systems, Mitsubishi Electric stands out at one of the best. Their highly efficient heat pumps are designed to keep homes and businesses warm during even the harshest of winters. North Wind HVAC offers comprehensive repairs and reliable installations of Mitsubishi Electric ductless systems, ensuring our customers can enjoy the comfort that comes with Mitsubishi Electric’s efficient solutions.
What is a ductless Mitsubishi Electric system?
A ductless Mitsubishi Electric system, also known as a ductless air conditioning system, is an advanced heating and cooling solution that efficiently regulates the temperature in your home without the need for traditional ductwork.
The system comprises two main components: an outdoor heat pump and an air handling unit that is installed indoors. Unlike conventional HVAC systems, ductless AC operates without air ducts, making it a versatile and space-saving option.
During warmer months, the air handling unit extracts warm air from your home and passes it over evaporator coils filled with refrigerant. The refrigerant absorbs the heat from the air and transfers it to the outdoor unit, effectively expelling it from your living space.
Conversely, during colder months, this process is reversed. The outdoor unit absorbs heat from the outside air and transfers it through the refrigerant line to the air handler. The air handler then circulates the warmed air into your home, providing a comfortable indoor environment.
The key to the operation of a ductless AC system lies in heat transfer. It efficiently removes hot air during summer and brings in warmth during winter, ensuring year-round comfort for your household. If you have any further questions or are considering the installation of a ductless Mitsubishi Electric system, our team at North Wind HVAC is here to assist you with expert advice and service.
How do I know if a ductless Mitsubishi Electric system is right for me?
Choosing the right heating & cooling system for your home is essential, and the ductless Mitsubishi Electric system may be the perfect fit for you. Ductless systems offer numerous advantages over central air conditioning systems.
One significant benefit of ductless systems is the elimination of the need for ductwork to regulate the temperature in your home. This not only simplifies the installation process but also makes the system more budget-friendly. Ductless systems are particularly well-suited for older homes or additions where pre-existing ducts may not be available.
Efficiency is another key advantage of ductless systems. With traditional duct systems, energy loss can be a concern, leading to higher energy bills. However, ductless systems bypass this issue altogether, resulting in improved efficiency and reduced energy costs.
Noise levels can greatly impact your home’s comfort. Unlike central air conditioners, ductless units operate with significantly less noise, providing you with a comfortable and serene environment.
By considering these factors, you can make an informed decision about whether a ductless Mitsubishi Electric system is the right choice for your HVAC needs. Should you require further assistance or have any additional questions, our team at North Wind HVAC is here to provide expert guidance and support.
What is zoned heating and cooling?
Zoned heating and cooling is a distinctive feature that sets ductless systems apart from traditional air conditioning systems. With zoned heating, you have the ability to regulate the temperature of individual rooms separately, rather than controlling the entire house’s temperature.
To implement zoned heating and cooling with a ductless system, an air handler needs to be installed in each room that requires heating or cooling. These designated rooms become the zones. Embracing this approach offers several benefits, both in terms of personalized comfort and energy efficiency.
By adopting zoned heating, you can avoid the unnecessary cooling or heating of areas that are seldom used. This translates to reduced energy waste and more cost-effective operation compared to central AC systems. Additionally, zoned heating enables each family member to enjoy their preferred temperature in their respective rooms. For example, parents can maintain a cooler atmosphere in their room while children can keep their rooms warmer, thanks to the individualized control provided by separate air handlers in each zone.
Zoned heating and cooling with a ductless system delivers enhanced comfort and energy savings, making it a compelling choice for homeowners seeking greater control over their indoor climate.
How are ductless systems installed?
Installing ductless systems is a relatively swift and straightforward process compared to conventional systems. The installation begins with drilling a small hole, approximately two to three inches in diameter, in your house to connect the outdoor unit to the air handler. Rest assured, this hole will be discreetly covered by the outdoor unit after mounting.
Once the hole is in place, the outdoor unit will be securely mounted on your house, and the air handler will be positioned inside your home, typically near the ceiling. To establish the connection between the indoor and outdoor units, a conduit containing the refrigerant line, a power cable, and a condensate drain will be used.
Our team of experts at North Wind HVAC is well-versed in ductless system installations and will ensure a smooth and efficient process for your utmost satisfaction. If you have any further inquiries or require professional installation services, do not hesitate to contact us.
We are here to assist you every step of the way.
Why is my Mitsubishi Electric system not turning on?
If you find that your Mitsubishi Electric system is not turning on, the issue may be related to a tripped circuit breaker. To troubleshoot, first, locate your circuit breaker in the meter box and check if the air conditioner’s circuit has been switched off. If so, simply reset the breaker by switching it back on.
However, if the circuit breaker continues to trip repeatedly or if you encounter difficulties with the isolation switch, such as it being hard to move or getting stuck, we recommend seeking assistance from a licensed technician. Our experienced team at North Wind HVAC is readily available to provide the necessary help and resolve any issues you may be facing with your Mitsubishi Electric system.
Please don’t hesitate to reach out to us for professional support and fast resolutions.
Mitsubishi Electric Ducted Repair & Installation
As the seasons shift, nothing is more crucial than having a dependable heating and cooling system that ensures year-round comfort. Mitsubishi Electric’s cutting-edge ducted heating and cooling system, powered by heat pump technology, offers the perfect balance for your home’s comfort. Rely on North Wind HVAC for any necessary repairs or the installation of your new ducted Mitsubishi Electric system. We provide outstanding service that always prioritizes you and your schedule.
What is a ducted Mitsubishi Electric system?
A ducted Mitsubishi Electric system is a type of system that utilizes ducts and vents to circulate air throughout a building. This system is commonly used for heating, ventilation, and air conditioning purposes.
The setup consists of an outdoor unit housing the compressor, cooling coils, and an electric motor, along with an indoor blower. The blower draws warm air from inside the building, sending it to the outdoor unit where it is cooled/heated. The conditioned air is then distributed back into the building through ducts.
One of the key advantages of ducted systems is their ability to deliver cooled/heated air precisely to where it’s needed, maintaining comfort while keeping other areas of the house consistent. The system can be controlled automatically through a built-in control panel with temperature and pressure sensors, or manually via a remote, wall-mounted panel.
Can you convert a ducted gas heating to electric?
Yes! Converting a ducted gas heating system to an electric is indeed possible, and it can be accomplished by replacing the gas heating unit with an electric one without the need to modify the existing ductwork and components.
However, it’s essential to consider the compatibility of your current ductwork with the new electric heating system. In some cases, older ductwork may not be compatible, which could lead to potential issues. To avoid any complications, it’s advisable to explore options for an electric heating system that is compatible with your existing ductwork.
If your ductwork is too old or has leakage problems, it would be prudent to consider replacing it. This ensures optimal performance and efficiency for your new electric heating system.
Benefits of Converting to an Electric Heating System:
Energy efficiency: Electric heating systems are known for their higher energy efficiency, leading to potential energy savings in the long run.
Reduced greenhouse gas emissions: By using electricity as a heating source, you contribute to reducing greenhouse gas emissions and promoting environmental sustainability.
Reduced operational costs and long-term savings: Electric heating systems often have lower operational costs compared to gas heating, providing potential cost savings over time.
No risk of indoor carbon monoxide poisoning: Unlike gas heating systems, electric heaters do not produce carbon monoxide, ensuring a safer indoor environment.
Improved indoor air quality: Electric heating systems do not emit any combustion byproducts, which helps maintain better indoor air quality.
Converting to an electric heating system can be a straightforward process, but it’s important to be aware of potential limitations. We recommend seeking out professional HVAC assistance, such as North Wind HVAC, who can simplify the replacement process and ensure a smooth transition.
Can you use the same ducts for heating and cooling?
Certainly! In the majority of cases, we can utilize your existing ductwork when installing a new Mitsubishi Electric system. This advantageously keeps costs down and minimizes the duration of the installation process.
However, there are a few exceptions to consider. If your current ductwork was poorly designed or installed, it might not effectively support a heat pump’s functionality, necessitating the replacement of the ductwork. Additionally, extensive home construction or other events may have caused damage to the ducts, rendering them unusable. In such instances, significant repairs or complete replacement of the ductwork might be required.
It’s essential to note that there could be alternative high-efficiency options, like ductless heat pumps, which may prove more cost effective than replacing all of your ductwork. Our expert team will carefully assess your specific situation and recommend the best solution to meet your heating and cooling needs efficiently.
Why is my Mitsubishi Electric system not blowing out cold air?
If your Mitsubishi Electric system is not blowing out cold air, there could be various reasons behind this issue. Below are the five most common causes and their respective solutions:
Unmaintained outdoor unit: Your outdoor unit is exposed to various elements such as sunlight, rain, and debris, which can affect its performance. Check the outdoor unit for good airflow and ensure there are no obstructions like weeds or grass that could block it. If the unit is still not cooling adequately, it might be hindered by a pile of debris, which you can clean yourself or have a technician assist with.
Unfitted unit: For recently installed systems that are not cooling effectively, it’s possible that the unit’s capacity is either too small or too big for the room it serves. Assess your room’s characteristics, such as the number of windows and the amount of sunlight it receives, to ensure you have an appropriately sized unit.
Clogged filter: Restricted airflow can hamper the cooling efficiency of your Mitsubishi Electric system. If you notice it getting warmer, check and clean the air filter. A clogged filter can impede the proper flow of air, and cleaning it with a brush can help resolve the issue.
Low on refrigerant: A common cause of inadequate cooling is low refrigerant (Freon) levels in the Mitsubishi Electric system. Refrigerant plays a crucial role in cooling the air circulating through the system. If your unit is low on refrigerant, the air blowing into your room will not be as cool as before. In such cases, it is best to call a North Winds HVAC technician to refill the refrigerant.
The broken thermistor on the outdoor unit: The AC system relies on the thermistor to reach and maintain the set temperature. If the thermistor is broken, it fails to send the signal to the unit to cool the room properly. If you suspect a broken thermistor, seek the assistance of a North Wind HVAC technician to have it repaired or replaced.
What to do if my Mitsubishi Electric system is making strange noises?
If you notice strange noises coming from your Mitsubishi Electric system, there could be several reasons behind it. Here are some common causes to consider:
Bearing wear: The noise from the split system fan is often related to bearing wear, especially in lower-quality models where the fan blades may touch the structure due to the deformation and warping of inexpensive plastic components.
Hissing when turned on: This sound can be caused by issues with refrigerant transport through the system, such as narrowing of sections, tube wrapping, or clogging in the cavities. Proper refrigerant handling during maintenance is crucial to prevent overheating and compressor failure.
Increased vibration: Imbalance in the fan impeller is a frequent cause of increased vibration. This could result from balancing weight displacement or uneven impeller contamination. Regular maintenance and cleaning of the Mitsubishi aircon can help resolve this issue.
Intermittent vibration: Poor fitting of individual housing elements, such as overlays and grilles, may lead to intermittent vibrations. In such cases, the removal of unnecessary elements or the addition of proper seals can help address the problem.
The noise level of the external unit can be influenced by the correct selection of elements (brackets, bolts) and the quality of the installation work. Installing rubber anti-vibration pads between the legs of the air conditioner and the bracket can reduce noise caused by vibration.
Clogging: Outdoor units may become noisy due to clogging caused by dust, debris, and insects over time. Regular maintenance is essential to keep the Mitsubishi aircon clean and maintain efficient heat transfer, preventing accelerated compressor wear and increased noise.
If you experience any of these issues or any other unusual noises from your Mitsubishi Electric system, it is advisable to seek professional assistance from our trained technicians at North Wind HVAC. Our experts will diagnose the problem and provide the necessary repairs to ensure your system operates smoothly and quietly.
We Are Here For You
This is Why You Should Call Us
Choose North Wind HVAC Services for your heating and cooling needs. With skilled technicians and years of experience, we are known for excellence and reliability. Our commitment to customer satisfaction ensures your comfort and peace of mind. Trust us for prompt arrival, accurate diagnoses, and tailored solutions.
From Mitsubishi Electric system repair to installation and maintenance, we have you covered. With us, your HVAC systems are in the hands of caring experts. Experience the difference between North Wind HVAC services, your reliable partner for all your needs. Call us today and discover why customers trust us time and time again.
Mitsubishi Electric System Error Codes
0403: Serial communication error
The fault occurs when there is a communication issue between PCB’s in the outdoor unit. If the model number is YGMA, YHMA, YJMA, YKMA or YLMA then the issue can be between the main board and inverter board or main board and fan board.
0900: Test run
The test operation dip switch on the Lossnay circuit board has been set ON.
1102: Discharge temperature fault
Insufficient cooling of the compressor caused by lack of refrigerant or a restriction in the refrigerant circuit, high ambient running conditions or airflow problems on either indoor or outdoor unit (depending on running mode), overheating of the compressor through increased friction (compressor beginning to seize), faulty thermistor reading.
1301: Low-pressure fault
Possible refrigerant leak. Restriction or blockage in refrigerant circuit causing low side pressure to drop. Problem with the pressure sensor reading incorrectly.
1302: High-pressure fault
High-pressure faults are commonly caused by a blocked condenser coil, a faulty fan motor, a restriction of airflow on indoor units in heating mode or a blockage/restriction in the pipework.
1500: Refrigerant overcharge
Normally caused by excessive refrigerant returning to the outdoor unit which over-cools the compressor. The system is either over-charged or there are valves operating incorrectly allowing refrigerant to ‘flood’ back to the compressor.
2500: Drain sensor submergence
The water pump is off/faulty. The water flow rate is too slow. The float switch is faulty.
2502: Drain pump fault
Check the indoor drip tray for water. If there is excessive water then there may be an issue with the internal pump or drains. If the tray is dry or hasn’t enough water to lift the float switch then check the float switch for continuity. If the switch is lifted the circuit should be made. If the switch is down then the circuit should be open.
2503: Drain sensor fault
The drain sensor is open/short-circuit.
4102: Open phase
Missing main phase. Check the power supply and noise filter for the correct 3 phase, and check wiring and fuses.
4106: Transmission power supply fault
Transmission (M-Net), incorrect wiring. Check wiring, high current, and incorrect voltage on the transmission line and/or M-Net board. Make sure M-net transmission wiring is daisy-chained.
4115: Power supply signal sync error
Incorrect power supply, blown fuses or possible faulty PCB. Check mains power is correct, check the fuses, and connections PCB.
4116: RPM error/Motor error
Faulty connection of a fan: Check the connection for the fan motors.
Faulty connection of the leads between the Control board and the Power board: Check the connections between the Control board and the Power board.
Model selection switch SW6 is set incorrectly: Confirm that the model selection switch SW6 is set correctly for the model.
Ambient temperature in which the unit is located is high: Check the temperature around the Lossnay.
Fan isn’t fixed correctly: Confirm that the fan motors are fixed securely.
Deformed centrifugal fan: Check that the centrifugal fan is clear of debris.
Centrifugal fan has foreign objects in or around it: Replace the fan motor.
Fan motor fault: Replace the circuit board.
Circuit board fault: Check the connections of the reactor (TB3-4) and check the resistance of it.
Faulty connection of the reactor: To identify which fan the issue is with, check the LED flashing sequence and contact After Sales Technical Support.
4220: Abnormal bus voltage
Low mains power supply, diode fault. Check mains supply. Check DC bus voltage coming from the diode.
4225: Low bus voltage
Incorrect mains supply or fan board fault. Check mains power is ok and there is at least 300vdc at the diode stack.
4230: Heatsink overheat protection
Blockage in the air passage of inverter heatsink, Inverter board failure, inverter fan failure. Check blockages in air duct failure of INV fan or failure of the thermistor.
4240: Overload protection
If a high current is detected for more than 10mins. Check inverter balance. Reduced airflow through the heat sink.
4250: Over current protection
High amps are drawn by the compressor or an issue with the inverter. Carry out an inverter output test to check if the inverter is working correctly. Use the “inverter testing guide” in the City Multi section of the APP. If the inverter is ok then check the compressor windings for a short or open circuit.
4255: Outdoor fan error
Grounding fault of fan motor or fan board fault. Check the voltage on CNVDC on the fan. This should be a high DC voltage around 580vdc. Also check the fan motor windings for an open or short circuit.
4260: Heatsink overheat protection at startup
Reduced airflow through the heat sink. Fan motor problem. THHS thermistor problem.
5101: Temperature sensor fault
Faulty thermistor – dead short/open circuit: The fault can be related to indoors or outdoors so check the fault code for the address of the unit in fault first.
Damaged thermistor cable or poor connection to PCB: Check the connection of the thermistor on the PCB and thermistor wiring.
PCB incorrectly reading thermistor value: Unplug the thermistor and test the resistance value.
5102: Return Air thermistor fault/check the connection onto the circuit board.
The circuit board cannot read the thermistor correctly. Check the connection onto the circuit board, check the resistance of the thermistor, replace the thermistor, replace the circuit board.
5110: Outdoor inverter heatsink thermistor error
Reduced airflow through inverter heatsink. Open/short circuit sensor, disconnected from PCB.
5201: Pressure sensor fault
PS1 Pressure fault. Check pressure reading using the dipswitches outdoor. Check the connection of PS3 on PCB.
5301: Current sensor fault
ACCT or DCCT sensor error. Check inverter error details, check the resistance of the current sensor, and check the connections of sensors.
5701: Loose float switch connector
The indoor unit’s internal float switch connector has detected an open circuit. Check the float switch is operating correctly. If the switch is down then the switch should be open. Also, check for external pumps wired in across the fail-safe connection.
6201: Remote controller issue
The remote controller is faulty, replace the controller.
6600: Address overlap
There is more than one unit with the same MNET address or two or more devices are addressed the same. Check the address set on each device on the same MNET network, also check address settings on outdoors, indoors, BC boxes and remote controllers to see if two have the same address settings.
6601: Polarity setting error
No voltage or short circuit on M-Net transmission line TB7. Check TB7 connections on outdoors and central controllers. Check for voltage on TB7. Check cable size and spec.
6602: Transmission processor hardware error
Noise interference. Polarity problem on TB7: Check M-Net connection on TB7 and the central controller. Check cable size/spec.
Controller where the error originally occurred is defective: Check the controller where the error occurred and replace it if required.
Lossnay circuit board is defective: Replace the circuit board.
6603: Transmission line bus busy error
Power is supplied to the same transmission cable from two or more power supply units, the power supply unit is connected to the TB3 side of the power supply expansion units, or the power supply units are connected to the indoor and outdoor transmission cables.
6606: Communication fault
Poor connection of MNET terminals, MNET cables have been terminated whilst the unit is powered, or malfunction of the unit PCB.
6607: No ACK error
Lossnay has no power, or the lossnay address has been changed. The transmission cable is in excess of 500m or is not securely terminated.
6608: No response error
When using multiple Lossnay units, the Main/Sub switch has not been set, there could be interference on the transmission line, the cable length is in excess of 500m, the transmission cable is not securely connected, or multi-core cable is being used for multiple uses and causing interference.
6831: MA controller signal reception error
MA controller being wired into the M-Net. Wrong cable size/spec. Check where the remote is wired to, check cable length is no bigger than 500 meters, check the connection and type of cable used, and check R/C is not set Sub on field settings.
6832: MA controller comms fault
MA controller being wired into the M-Net. Wrong cable size/spec. Check where the remote is wired to, check cable length is no bigger than 500 meters, check the connection and type of cable used, and check R/C is not set Sub on field settings.
6833: MA controller comms fault
MA controller being wired into the M-Net. Wrong cable size/spec. Check where the remote is wired to, check cable length is no bigger than 500 meters, check the connection and type of cable used, and check R/C is not set Sub on field settings.
6834: MA controller signal reception error
MA controller being wired into the M-Net instead of the remote terminals. Wrong cable size/spec. Check where the remote is wired to, check the cable length is no bigger than 500 meters, check the connection and type of cable being used, and check R/C is not set Sub on field settings.
7100: Total capacity error
The total indoor unit capacity exceeds the outdoor unit allowable capacity. On a PURY outdoor you are allowed up to 150% of its capacity and on a PUHY/PUMY outdoor you can have up to 130% of its capacity.
7101: Capacity code setting error
SW2 set wrong on indoors, SW5 dips set wrong on YHM-A outdoor, SW3-10 on older kit.
7102: Wrong number of connected units
The outdoor unit is not seeing any indoor units or it is seeing more than the allowable value. Check voltage on M-Net, power to the BC box, check dip switches are set correctly on the BC box and the model type of BC box is correct for the system.
7106: Attribute setting error
GUF unit being used on City Multi system. Make sure SW3-1 setting is on, on the GUF.
7110: Signal transmission error
Loose or miss wiring of TB3 or TB7. SW5 dip 7 is not set outdoors. The transmission booster was turned off. Check M-Net connections, and dipswitches outdoors.
7113: Function setting error
More than 1 unit in the group is set to as the Main Lossnay (SW5-10 ON), or the group contains two or more units with the same address. The Lossnay that is set to the Main, has not been set to the lowest unit address in the group.
7117: Model setting error
SW5 set wrong on the outdoor or wrong resistors fitted. Check dips, resistors and thermistors.
7130: Incompatible unit combination
Check split with MAC 399 wired onto the TB5 line, not the TB7. Check M-Net wiring on systems.
E1: Remote controller communication issue
Faulty controller or poor wiring connection/abnormal voltage to the Remote controller. Check the remote controller wiring connection onto the FTC terminals and ensure there is 12vdc down to the Remote controller and make sure LED2 is lit on the FTC Control board.
E2: Remote controller transmitting error
Incorrect wiring of remote or incorrect dip switch setting if units are grouped. Check unit addressing if grouped or check remote is only wired to the master indoor unit.
E3: Remote controller communication/receiving error
Incorrect settings on SW1 switches at the outdoor unit or poor connection or wiring of the remote controller. Check for 12vdc down to the controller and make sure LED 2 is lit on the FTC board, also check the SW1 dips switches on the outdoor unit are set correctly.
E5: Remote controller communication/receiving error
The remote controller is incorrectly wired or the controller does not have the correct 12vdc supply, or incorrect settings on SW1 switches at the outdoor unit. Check for 12vdc down to the controller and make sure LED 2 is lit on the FTC board, also check the SW1 dips switches on the outdoor unit are set correctly.
E6: Indoor to outdoor communication fault
Loss or no communication between the FTC and outdoor Ecodan. Poor connection of the interconnecting cable or not the correct 12-24vdc fluctuating voltage between S2 and S3. Reset power supply to both indoor FTC and outdoor Ecodan. Power back up the indoor first then the outdoor. Check interconnecting cable connections and voltages. Check indoor FTC LEDs.
E7: Comms failure indoor to outdoor
Mis-wiring of indoor to outdoor cable. The system powered up incorrectly. Check for pumps wired in, Check the indoor isolator, and Repower in the correct sequence i.e. indoor then outdoor.
E8: Indoor to Outdoor communication error
Loss or no communication between the FTC and outdoor Ecodan. Poor connection of the interconnecting cable or not the correct 12-24vdc fluctuating voltage between S2 and S3. Reset power supply to both indoor FTC and outdoor Ecodan. Power back up the indoor first then the outdoor. Check interconnecting cable connections and voltages. Check indoor FTC LEDs.
E9: Indoor to outdoor communication error
Loss or no communication between the FTC and outdoor Ecodan. Poor connection of the interconnecting cable or not the correct 12-24vdc fluctuating voltage between S2 and S3, also the SW8-3 could be set to OFF when independent power supplies are used. Reset power supply to both indoor FTC and outdoor Ecodan. Power back up the indoor first then the outdoor. Check interconnecting cable connections and voltages. Check indoor FTC LEDs. Power down the complete system and set SW8-3 to ON before powering the FTC before the Ecodan.
Keep in mind that these are the most common error codes, please check the Mitsubishi Electric website if you don’t see your error code here. To ensure accurate diagnosis and resolution, we strongly advise consulting a professional technician.
Quality Brands We Trust
Brands We Service
Every HVAC Repair and Installation Service Under One Roof!
Get in touch with our experts to book your appointment, today.

Quick Response within 2 Hours

Same/ Next Day Service

Best Prices

Top Rated

24/7 Support, Repair & Installation